How To Install WordPress Locally (7 Easy Steps To Follow)
- Leisl Novák

- Sep 8, 2020
- 6 min read

Developing a website is one thing and making it live for your audience is another. You can create a website design in a few days but you can’t put it out on the main server without checking for bugs or errors. You know well that in order to deliver a great user experience to your visitors, your website should be able run smoothly. And that’s where a local website development looks like an urgent need.
There are multiple advantages of developing WordPress websites locally. You can create and customize your website the way you want without worrying that it will damage your site. Not just that, if you want to make additional changes that you think will help your website to perform better, you can do that as well. Remember, a local website development allows you to set up your server on your own computer. And since you are the sole incharge of your website you can do all the experimentation with your site before moving it to the permanent server.
Though there are various tools available in the market for local website development, we will use XAMPP for this tutorial. But before you dive into more details I would like to discuss a few things about our web design company in Los Angeles - SFWP Experts. We are a prominent company located in the center of the US that offers a wide range of business development services to clients across the globe. You can get in touch with us to avail WordPress web design, web development, app development, SEO, PPC, and online marketing services.
With that over, let’s take a brief look at what XAMPP really is:
What Is XAMPP?
XAMPP is a local server that is commonly used to create a local environment when building PHP websites. It helps you to test your website for any bugs or errors in the local environment. As I said before, doing this is critically important before you finally upload your site on the main server.
If you also want to know what XAMPP does stand for, I must tell you it is the short form of X-OS, Apache, Mysql, PHP, Perl.
In case you are an entrepreneur who just wants a readymade website to run your business, you can contact our Los Angeles web design company to do all this hard work for you.
Now let’s take a look at the steps to install WordPress on your local machine:
7 Steps To Install WordPress Locally With XAMPP
Step 1: Download The XAMPP Application

To download the XAMPP application you can go to Apachefriends.org/index.html. After visiting the website you can select the suitable version required for your specific operating system and then download.
Step 2: Install The XAMPP Application
After you have downloaded the file, you need to double click on it and then the software will start installing. While the installation is in process, if a window pops up asking “whether you want to run this file”, simply press the “Run” button and continue.

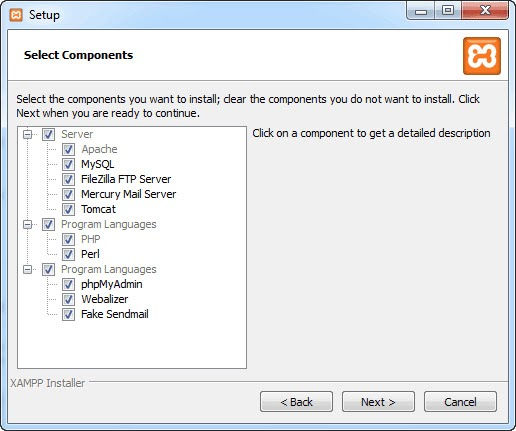
Note that you don’t need to change the default component settings while installing this application. Once you have ensured that the default setting is unchanged, click on the next and continue.
After a few moments when you will be asked to select a folder to install XAMPP, you can make two choices. Either leave the default location or enter the destination of a new folder. If you are not able to make a confident decision, we recommend installing it in the default folder.

Wait for sometime until XAMPP is installed and then jump to the next step.

In case you face unexpected problems while installing the XAMPP software on your computer, you can connect with our Los Angeles web design company with your concern.
Step 3: Activate The XAMPP Application
After the XAMPP software is installed, the next thing you need to do is checkmark “start the control panel now”. Once you have done that, simply click on the “Finish” button located at the bottom of the wizard.

Now when the control panel of your XAMPP application is opened on your computer screen, press “Start” buttons for Apache and MySql modules.

Note that just after doing that you will get a security alert from Windows. Then you will have to click on “Unblock” and your local XAMPP will become ready to function.
Before you proceed ahead, it is necessary to make sure that everything is running properly. So, to do that you will have to open your browser and type in https://localhost. If XAMPP is installed, activated, and working properly on your computer, you will see a page in your web browser something like this:

Step 4: Create A Database
As every website has a central information storage, yours need to have one too. So, before you install WordPress, create one database for your upcoming website.
To do that, you will have to go back to the XAMPP control panel. Here you need to click on the “Admin” button for MySQL that can be found right next to the “Stop” button.
.

The second you press the “Admin” button, the MySQL admin panel will be opened in your web browser.

Once you are on the MySQL admin panel, click on the “Databases” tab. Type a name for your database there and then hit the “Create” button.
Since you can have more than one WordPress installation on your system, it is important to give your database a meaningful name so that you can easily understand which installation it is for.

After clicking on the “Create” button when a confirmation message appears on your screen that you have successfully created a database, then you are ready to move to the next step.
In case you develop some sort of doubt while carrying out the steps, feel free to talk to our web design company in Los Angeles.
Step 5: Download The WordPress Software
Next, navigate to WordPress.org and download WordPress on your personal computer. Once the zip file of WordPress is downloaded, shift that file to the “htdocs” folder inside XAMPP.

After doing that, you will have to extract it by right-clicking on it and choosing the extraction option.

Again, it is necessary to remind you that since you can have more than one WordPress installation on your computer, you need to provide a unique name to your WordPress folder. This will make it easy for you to identify the folder in the future if you create another one someday.
Step 6: Set Up Your WordPress Installation
Now the second last thing that you need to do is editing a file and then renaming it. So, in order to do that you will have to head to your WordPress directory and look for wp-config-sample.php file. Once you get it, you will have to open that file with any text editor of your choice like Notepad++ or others.

After opening the file, you need to search for a specific part that’s shown below:

Then make changes to the text marked in the red boxes and ensure it has the same database name that you have given earlier.
Once you have changed the database name, save the file and give it a different name than what was earlier. For example, change the file name to wp-config.php instead of wp-config-sample.php.

Step 7: Install The WordPress Software
Installing WordPress on your computer is very easy since you just need to open https://localhost/wordpress/ in your web browser and use the WordPress installation page. There you will have to fill in some details and click on the “Install WordPress” button.

Once you have done that, the WordPress will install locally on your computer. And to use that local WordPress installation you will have to go to https://localhost/wordpress/ through your web browser.
Note: The WordPress in https://localhost/wordpress/ should be the name of the WordPress folder that you have created in the above steps.

Conclusion
So, you learned how to install WordPress locally in this blog, right? You must know that local website development is an important task that you must execute before making your site up and running. This saves you from facing multiple issues that might show up after your website is put out on the internet. That’s not all, it also saves you from forming a bad image in your visitor’s mind if something goes wrong when they are using your site. Assume that they come to your site to find certain information or products, and they are not able to do that because of improper functioning of your site, then it’s likely that they will never return to your site.
Do you have any questions about local website development? Leave it in the comments below! Besides, if you need any help with the design, development or hosting of your site, don’t forget SFWPExperts is always looking for needy clients like you to provide a solution. When you hire our Los Angeles web design company for WordPress website design and development, you can also avail other services like content writing, content marketing, search engine optimization, pay per click advertising and a whole lot more. Remember every investment you do for your website enhancement, it returns with more benefits.
Contact Details:
213-277-9177
Visit Reference Profile Websites:
Comments